Getting Started
Help New Features TCScan+ Website
To help you get started with TCScan+, we describe below the steps needed to find a set of bullish stocks whose current price is breaking above a down trendline. Once you have finished this procedure you should have a good base for running the other TCScan+ scan types. For further information please refer to the main Help page. If you can not find what you are looking for, please email us at support@tcscanplus.com
You may want to print this section so that you can more easily refer to it as you carry out the steps.
Step 1 - Overview
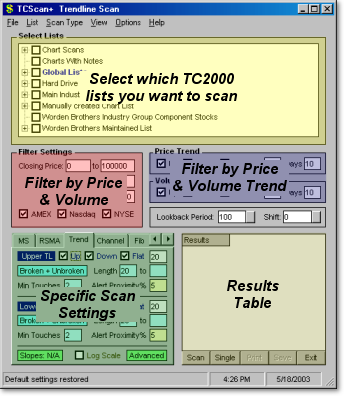
To start with, lets review the regions into which the main form is divided - see the picture below. The yellow region is where you select which of your TeleChart lists you want to scan. The red and blue sections are where you filter your lists by price, volume, exchange type and price/volume trend. The green section is where you select the type of scan you want to run, and the settings for that scan. The white section is where your results will be displayed. You also have the menu bar at the top of the form where you can select actions you want to perform, as well as command buttons underneath the results section.
Step 2 - Backup Current Settings
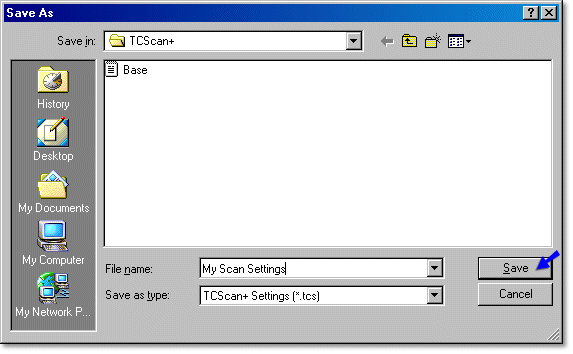
We will first save your current TCScan+ settings to a data file so that when you are finished with this exercise you can restore them. To save your settings, click on the File menu at the top of the form and select 'Save Scan Settings'. Notice that next to 'Save Scan Settings' is listed 'Shift+F11' This means that you can perform the same function by holding down the Shift key then pressing F11.
A dialog box will appear asking you to enter the name of the file in which you want to save the current settings. Enter 'My Scan Settings' and press the Save button.
For further information on saving your settings see Save Scan Settings
Step 3 - Selecting the lists to scan
Now that your old settings are saved, we can start setting up the new scan settings. First we will deselect any lists that might currently be in your scan settings, then we will select two lists for TCScan+ to scan. A common question asked by new users is why a scan shows that more stocks are being scanned than are in the lists a user has selected. The usual reason for this is that the user has additional lists selected from previous scans that they are not aware of. Therefore, we recommend clearing the list selection area before entering a new set of scan settings, unless you will always be scanning the same lists.
To deselect all lists, click on the List menu then select Clear All Checks - or press the F7 key. Notice that there are many other functions for manipulating the list selection area under the List menu, such as finding a list and counting the number of stocks in the lists you have selected.
Next we will select two standard TeleChart lists to scan: the S&P 100 component stocks and the Business Software & Services list. (If you are using the TeleChart Funds version, you will not find these lists - you could choose two other ones instead.)
For the S&P 100 list, find the main heading 'Worden Brothers Maintained List' in the list-selection region. Click on the '+' next to it to expand the list.

Once you have clicked on the '+', then the list will expand to show all the Worden Brothers maintained lists. Move the slider on the right of the list-selection box and find the list titled 'Standard and Poors 100 Component Stocks'. Click in the white box to the left of it, which will then become checked.

To make it easy to select the next list, we can 'collapse' the list selection tree, using the Collapse Tree command in the List menu, or by pressing the F6 key. When the tree is collapsed, you will notice that the main heading, 'Worden Brothers Maintained List', is highlighted in Blue and Bold - to indicate that a list is selected within it. This highlighting is an easy way to see whether and where lists are selected.

The next list we want to select is located under the 'Main Industry Group Component Stocks' heading. Click the '+' next to this heading, then locate the section titled 'COMPUTER SOFTWARE & SERVICES' and click the '+' next to it too.

Finally, move the scroll bar down to find the list titled 'Business Software & Services' and check the selection box next to it.

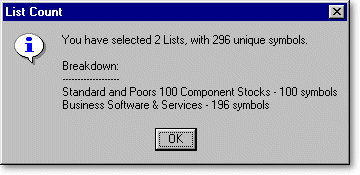
As a final check, select Count Items from the List Menu. This should show that you have two lists selected, and how many symbols are in the list. At the time of writing, the list count showed the following - but you will probably see something different as the composition of the lists change with time.
For further information on list selection and manipulation see Selecting Lists and List Menu
Step 4 - General Filter Settings
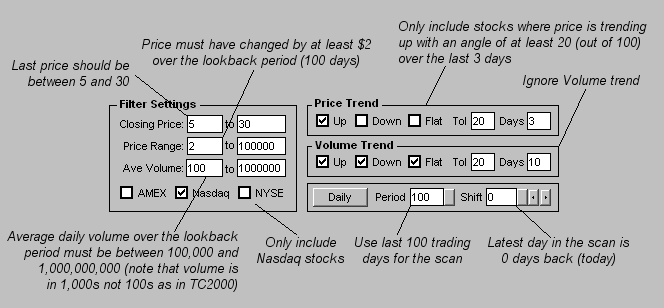
Next we will enter our general filter settings for price, volume and exchange. The diagram below shows the values to enter along with an explanation for each. Of special note, is that volume is shown in 1,000s in TCScan+ not 100s as in TeleChart. A common mistake for new users is to enter a high value for the minimum average daily volume, forgetting that the number they enter is multiplied by 1,000 - the result is that no stocks can pass the filter.
For further information on general filter settings see Filter Criteria
Step 5 - Scan Type Settings
We now will enter the settings we need to run the trendline scan. If the trendline tab (titled 'Trend') is not selected then click on it. If it is not visible, use the scroll buttons to locate it.

Now enter the specific trendline settings as shown below.
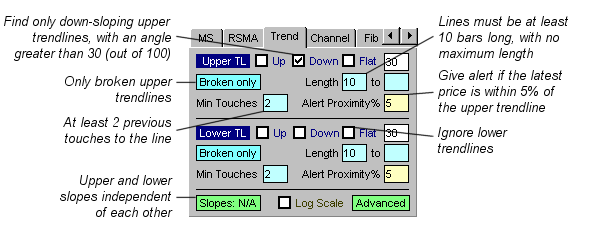
For further details on trendlines and trendline scan settings see Trendlines. For your convenience all the above settings are stored in the settings file 'Getting Started'. You can load them by pressing the F11 key from TCScan+.
Step 6 - Running the Scan
Now that the scan settings are entered, all we have to do to run the scan is press the Scan button near the bottom of the form, or press the F9 key. When the scan is running, you will see that the text of the Scan button changes to Stop - meaning that you can press the same button to stop the scan (or press F9 again.) The progress of the scan is indicated by messages on the status bar and by the progress meter, and stocks passing your filter settings are listed in the results table.

To read about other options when running the scan see Start Scan, Scan Single Item and Scan Results.
Step 7 - Reviewing Results
When the scan is complete, the stocks that have passed the scan settings will appear in the results table, and the number of stocks found will be shown on the status bar. A chart showing the first stock in the list will also be opened. (If the chart does not appear, then you will need to check the box next to Show Charts while Reviewing Results in the Options > Preferences menu.) You can also get the equivalent TeleChart chart to open for the scanned item at the same time, by checking the box next to Open item in TeleChart while reviewing results, also in the Options > Preferences menu.
You can step forward through the stocks in your results by pressing the Space bar, and backward by pressing the Backspace key. Various options are available for manipulating, saving and printing the results. For details see Reviewing Results. Various options are also available for manipulating the TCScan+ charts and adding objects such as lines, circles and Fibonacci lines. For details see Charts.
For this example, we will export the set of stocks in your results list to TeleChart.
Step 8 - Saving Results and Exporting to TeleChart
Method 1: Automatic Transfer (Versions 2.4 and later only)
To automatically export the items in your results list to TeleChart you select Export Scan Results from the File menu or the right-click menu for the results table. This will open up the form shown below. Enter 'Test List' as the list to export to, leave all the other settings as shown and press the OK button.
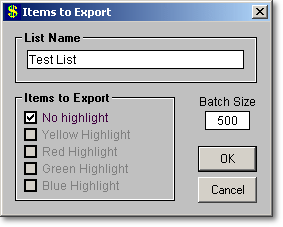
If this list name already exists, you will be prompted whether you want to add your items to it, otherwise a new list will be created. If a problem occurs during the process, please follow the suggestions provided by the messages that appear.
Method 2: Manual Transfer (Versions 2.3 and earlier.)
To manually export the stocks to TeleChart you first need to save them to your hard disk. To do that, click the Save button at the bottom of the form, or select Save Scan Results from the File menu. A form will open up allowing you to select saving options - leave them as shown below.
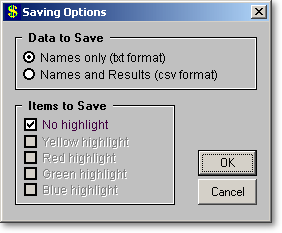
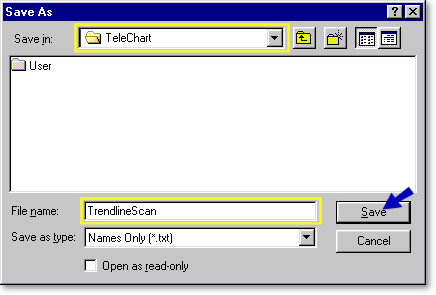
Click OK. A new form will open allowing you to enter a name for your results file. Enter the name 'TrendlineScan' and make sure that the type of file is 'Names Only (*.txt)' Take note where you are saving the file to, because you will need to get back there again when we import the file into TeleChart, then press the Save button.
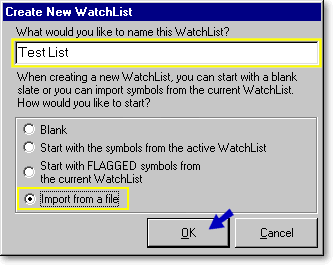
Now open TeleChart and create a new watchlist to hold your results. To do that, select Create New Watchlist from the File menu in TeleChart. A form will open up, looking somewhat like that below, depending on the version of TeleChart that you have. Enter 'Test List' for the list name and check the 'Import from a file' option button then press OK.
On the next form that appears, navigate to the 'TrendlineScan.txt' file you saved earlier, then press the Import button.
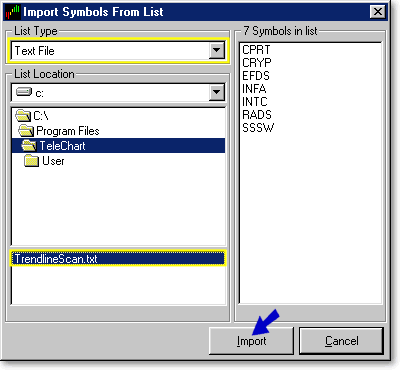
The stocks you saved will now be entered in your new watchlist, allowing you to monitor them as you do with other watchlists, or even include in future TCScan+ scans.
Step 9 - Restoring Previous Settings
Now that you have completed this scan, you can restore your previous settings (if you like.) To do so, select Load Scan Settings from the File menu, then navigate to, and load, your previously-saved settings file 'My Scan Settings'.
Conclusion
The above sequence of steps should serve you well in running the different scans available in TCScan+. For further details on each of the scan types, click Scan Types, and for details on the various commands available see Menus. For charting features click Charts and for a list for shortcut keys for commands select Shortcut Keys.
Help New Features TCScan+ Website